How to format write-protected USB drives? Write-protected USB drives block data changes, but most issues can be fixed. Please identify causes ranging from physical locks to system settings, and learn quick methods to fix this issue.
Write protection is a feature that prevents data from being modified, deleted, or added to a storage device, keeping your files safe from accidental changes or corruption. Write protection can safeguard your data, but it can also block you from formatting or editing your USB drive.
If you’re looking for ways to format a write-protected USB, this guide will show you quick and effective methods to remove write protection and restore full access to your drive.
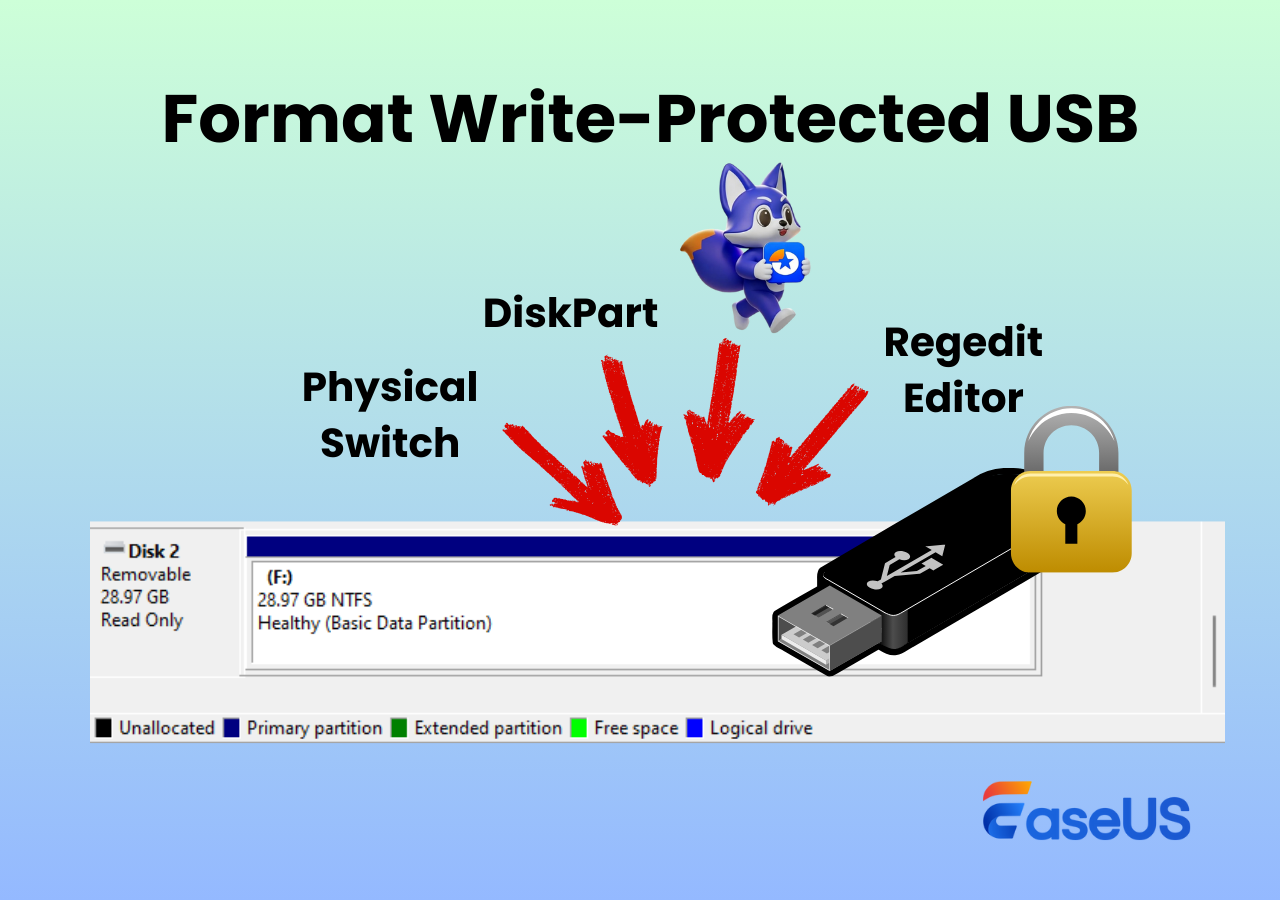
How to Format Write-Protected USB Flash Drives
As the title suggests, this section outlines four effective methods for formatting a write-protected USB flash drive.
- Physical Lock Switch: If your USB drive has a physical lock, start with the first solution.
- GUI-Based Method: For most users, the second method offers an intuitive interface, straightforward steps, and minimal technical skill.
- DiskPart Command-Line Tool: Ideal for system administrators or advanced users who need precise, low-level control over disk management.
- Registry Editor (Regedit): Designed for experienced users and IT professionals to configure, troubleshoot, or customize Windows at an advanced level.
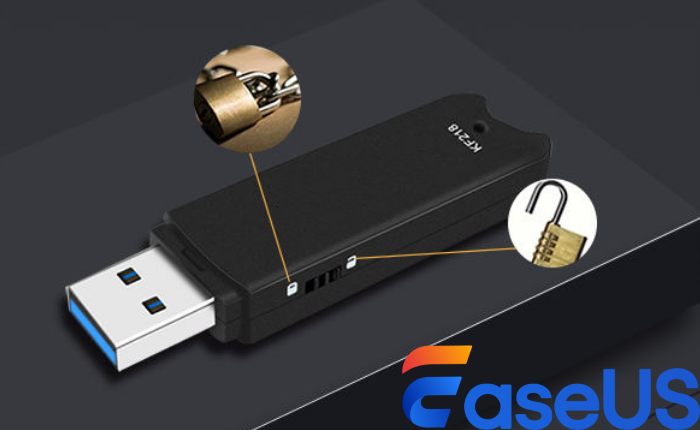
Method 1. Unlock the Physical Switch
If your USB flash drive or pen drive has a physical lock switch set to ON, the device becomes locked and write-protected. This prevents you from formatting this USB stick or modifying its content. Please follow the steps below to unlock write-protected USB drives.
- Locate the small slider on the side of the drive > move it from ON to OFF or the unlocked position.
Method 2. Use EaseUS Partition Master🔥
EaseUS Partition Master released a Write Protection feature (Version 17.5) that lets you easily enable or remove write protection on USB drives, SD cards, and external hard drives through a simple graphical interface, without using DiskPart or Registry edits.
Key features of EaseUS Partition Master:
- Support a wide range of USB flash drives, SD cards, and external drives from popular brands like SanDisk, Kingston, and Samsung.
- Support removable USB devices with USB 1.0, 2.0, and 3.0 interfaces.
- Provide the preview feature to avoid accidental operation or data loss.
- Support Windows 11/10/8.1/8/7 and Windows Server
The following steps depict how to format a write-protected USB drive using this comprehensive partition manager.
Step 1. Connect the USB drive to your Windows PC > launch EaseUS Partition Master.
Step 2. After loading the disk, select More > click Toolkits > choose Write Protection.

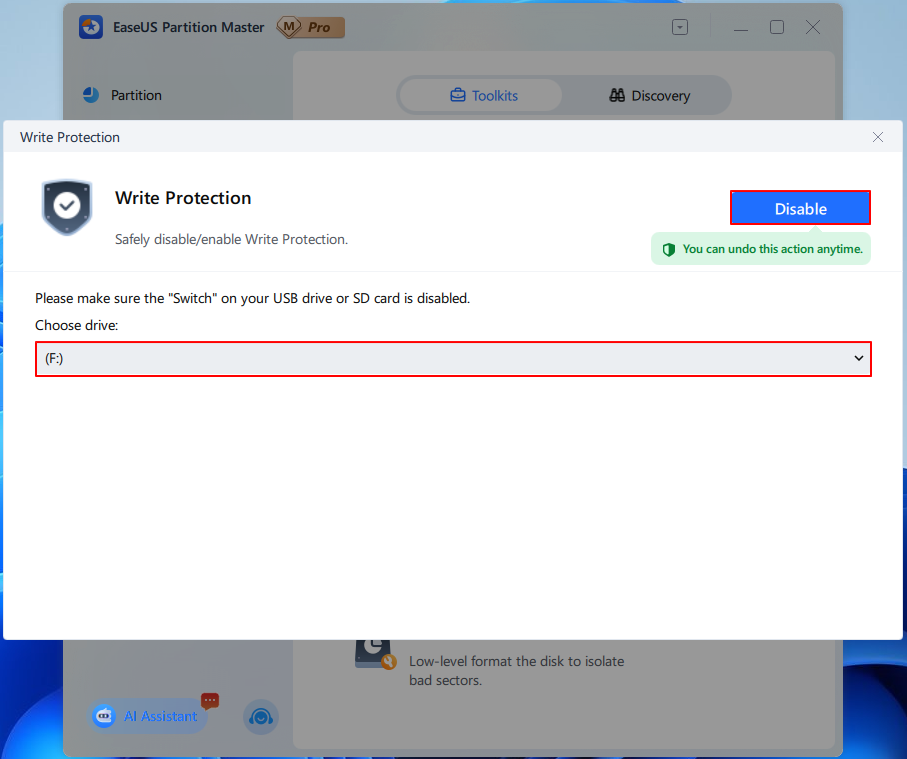
Step 3. In the new pop-up window, choose my write-protected USB stick > click Disable.
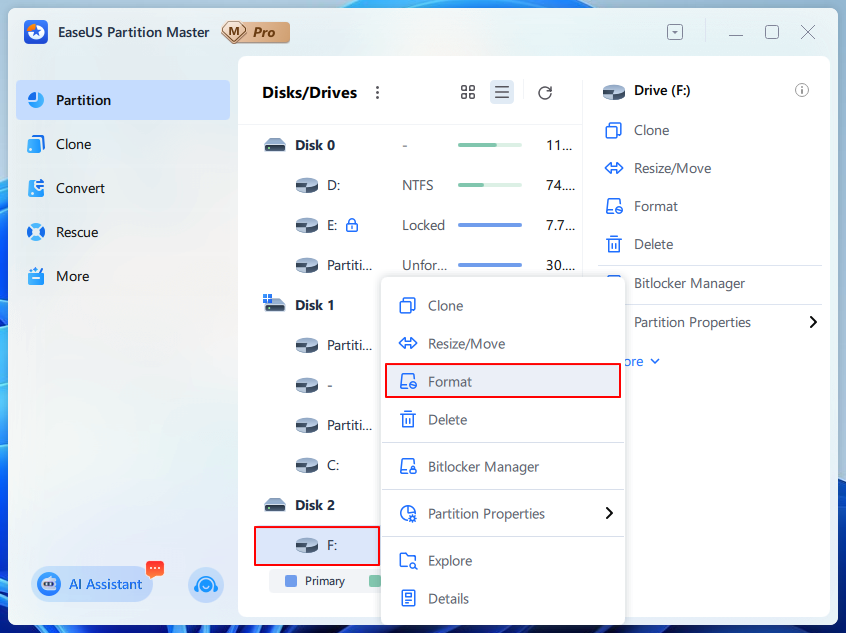
Step 4. After removing write-protection from your USB, go back to the main interface of EaseUS Partition Master > select Partition.
Step 5. Right-click on my USB (F:) drive > choose Format > follow the on-screen instructions to finish this formatting process.
Method 3. Run DiskPart
DiskPart is a powerful Windows command-line tool that helps you create, delete, format, and wipe your computer’s drives, including disks, partitions, volumes, and virtual hard disks. You can access it via Command Prompt (Run as Administrator) for advanced storage management and troubleshooting. Here are the steps.
Step 1. Connect the USB drive to your Windows > press Windows + X > click Disk Management to open it.
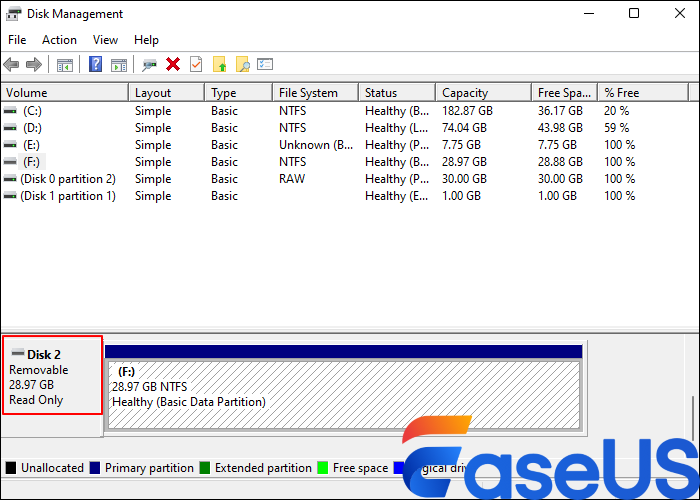
Step 2. Locate the disk that includes your USB stick. As shown in the following picture, my target disk is 2 and in read-only mode, and the drive letter of my USB drive is F.
Step 3. Type cmd in the search bar > click Run as administrator to open the Command Prompt window.
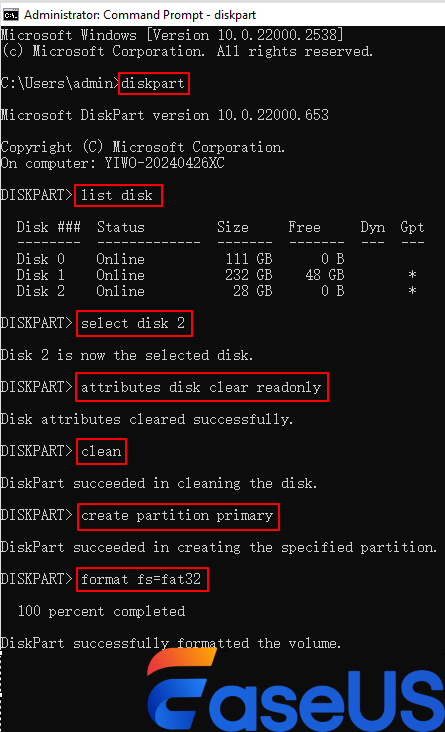
Step 4. Type the following command lines in order and hit Enter after each line.
- diskpart
- list disk
- select disk 2
- attributes disk clear readonly
If your USB drive is accessible, you can stop here.
Step 5. If not, follow the steps below using DiskPart to format the USB drive.
- clean
- create primary partition
- format fs=fat32 (You can also type format fs=ntfs if needed.)
Step 6. Exit the DiskPart > reopen your Disk Management to check if the read-only status of your USB has been changed.
Method 4. Edit the Regedit Editor
Is there another way to format write-protected USB drives? Of course, there is. The fourth method is using the Windows Registry Editor, which allows administrators and advanced users to make system-level changes, such as adjusting access permissions and modifying hardware or software configurations.
If the Control folder already contains a StorageDevicePolicies folder, you can skip the Step 3 and 4 directly.
Step 1. Please press Windows + R to open the Run box > type regedit in the search bar > click OK or hit Enter to open the Regedit Editor.
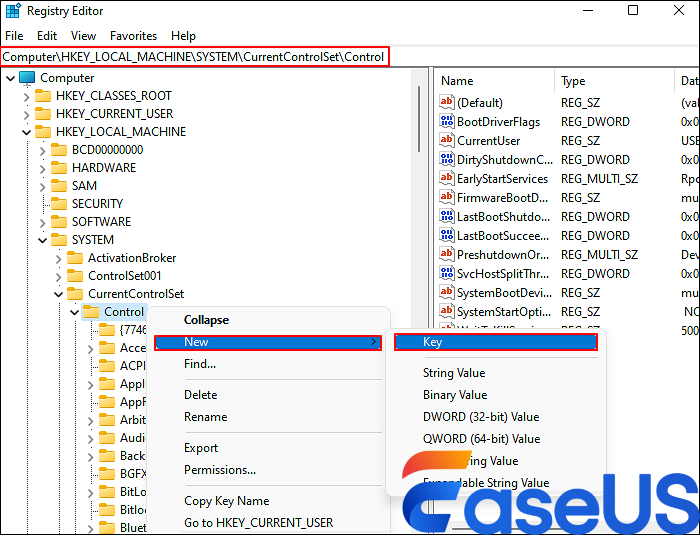
Step 2. Go to Computer\HKEY_LOCAL_MACHINE\SYSTEM\CurrentControlSet\Control folder > check if the StorageDevicePolicies folder exists in the Control folder.
Step 3. If there’s not, please right-click on the Control folder > select New > click Key > name the new folder as StorageDevicePolicies > hit Enter.
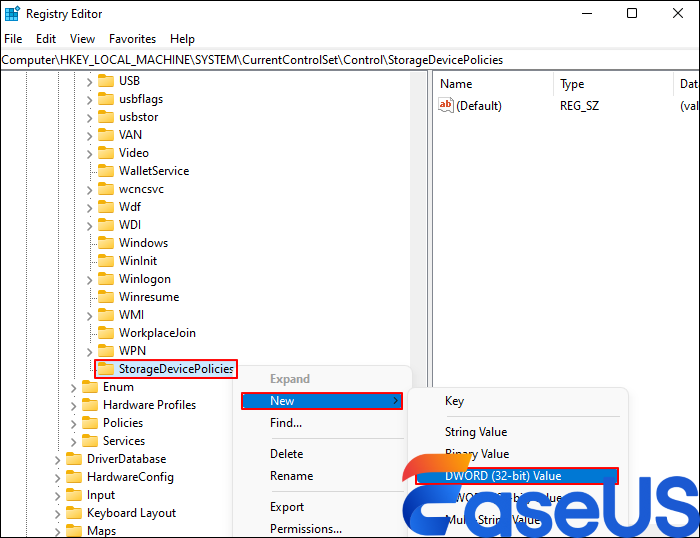
Step 4. Right-click on the StorageDevicePolices folder > click New > choose DWORD (32-bit) Value or DWORD (64-bit) based on your Windows version. Here, I select DWORD (32-bit).
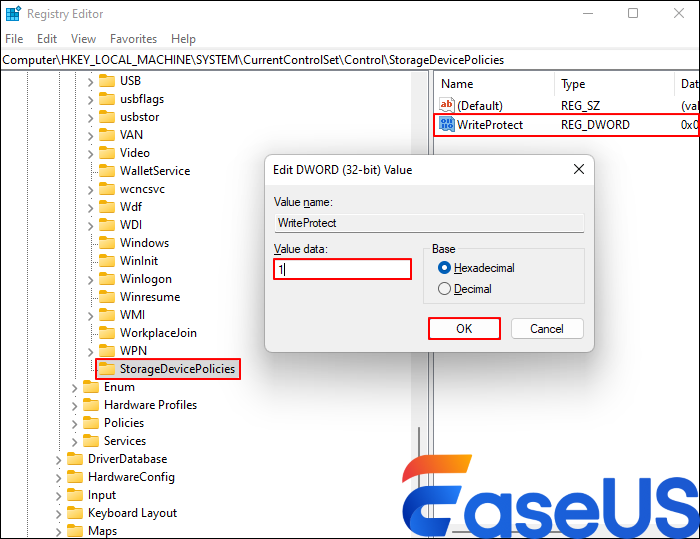
Step 5. Please rename the file name to WriteProtect > hit Enter. After double-clicking on the Write-Protect file, a new window will pop up.
Step 6. In the new window, please change the Value data from 0 to 1 > click OK.
Step 7. Close the Registry Editor > restart your PC > open your Disk Management again to reconfirm the state of your USB stick.
Why Is my USB Drive Suddenly Write-Protected
A USB drive may become write-protected when it detects internal controller issues, such as too many bad blocks, causing the device to switch to read-only mode automatically. There also exist several other possible causes. Please have a closer look at them below.
- Hardware failure or lifespan limits: Flash memory may reach the end of its lifespan or develop too many bad blocks, causing the drive to switch to read-only mode to protect existing data.
- Physical lock switch: Some USB flash drives or SD card adapters include a small lock switch that makes the device read-only when enabled.
- File system corruption: File system errors can force the operating system to block write access to prevent further damage.
- Full storage space: A USB drive with no available free space cannot store new data.
- Software or OS restrictions: Windows registry settings or group policies may be configured to block writing to USB devices.
- Virus or malware infection: Malicious software can modify security settings and trigger write protection.
Conclusion
Write-protected USB drives can be frustrating, but the issue is often fixable. Causes may include physical lock switches, system settings, file system errors, or internal hardware limits. To format write-protected USB drives, start with simple checks, then use tools such as EaseUS Partition Master, DiskPart, or Registry Editor. In most cases, EaseUS Partition Master can effectively resolve write-protection issues on USB drives, SD cards, and other local storage devices.
If the drive has reached the end of its lifespan, it’s necessary to back up your data and consider replacing it.
FAQs
Additionally, this section provides useful tips on write-protection. Check them out below if you want to learn more.
- What does it mean when a USB stick is write-protected?
Write-protect prevents any data from being written or modified on a storage device, while read-only mode allows you to view and copy files but blocks any changes.
- Is there a physical write protection switch?
Yes, there is. The built-in Physical Write Protect Switch protects your data by switching the device to read-only mode, preventing accidental overwrites and virus infections, and ensuring your files remain safe when locked.
- How to remove write protection on USB without switches?
The answer is to use the Windows DiskPart command-line tool to clear the read-only attribute. Please open Command Prompt as Administrator, then enter diskpart > list disk > select disk X (replace X with your USB number) > attributes disk clear readonly. If this method doesn’t work, you can try to edit the Windows Registry.